A subscriber identity module or subscriber
identification module (SIM) is an integrated
circuit that securely stores the International
Mobile Subscriber Identit...y (IMSI) and the
related key used to identify and authenticate
subscribers on mobile telephony devices ,such as mobile phones and
computers. It is also a portable memory chip used mostly
in cell phones that operate on the Global
System for Mobile Communications (GSM)
network. These cards hold the personal
information of the account holder, including
his or her phone number, address book, text messages, and other data.
When a user wants
to change phones, he or she can usually easily
remove the card from one handset and insert it
into another. SIM cards are convenient and
popular with many users, and are a key part of
developing cell phone technology. Sim Cards are of four (4) Types. Named as
Below H1, H2, H3, H4 H1= You Will Get Normal Network On This Sim
H2= You Will Get Better Network On This Sim,
Means Strong
H3= You Will Get More Better Network On
This Sim, Means Stronger
H4= Normal, Better, More Better Is Nothing In Front OF This Sim.
Basically H4 Sim giving for Corporate Sim,
Army Peoples etc. The Company doesn’t
Provide H4 Sim To all User,because this Sim eat
More bandwidth. For knowing Which Type of
Sim is using Just Check Its Back Side and will
Get the Sim No. and the Sim Type. SIM cards are made in three different sizes to
accommodate different devices. Most phones
use mini-SIM or micro-SIM cards, which are
quite small — the mini is 25 mm by 15 mm ,
and the micro is 15 mm by 12 mm.Full-sized
cards are much larger, 85.6 mm by 53.98 mm , and are too big for most
phones. All cards are
only 0.76 mm thick, and the microchip contacts
are in the same arrangement. This means that,
with the proper adapter, the smaller cards can
be used in devices designed for larger ones. A SIM card offers
security for both the user’s
data and his or her calls. The cards can be
locked, meaning that only someone who has
the correct personal identification number
(PIN) can use the card. If the phone is stolen,
the thief cannot use a locked SIM or get any information off of it
without the PIN.
A Blog about all my experience Tutorials, Tech News, Tricks, Fixing Problems, Free Software, Internet Service, Operating Systems, Laptop Repairs and More......
Saturday, July 13, 2013
Saturday, June 8, 2013
A Less Confusing View of World Time Zones
If you ever need to schedule an online meeting or a conference call with your co-workers who are located in different cities and countries, EveryTimeZone.com should come handy.
In Every Time Zone, you just have to drag the green bar to see the corresponding time (and date) in the different time zones of the world. The shades of blue indicate the hours of the day and the lighter the shade, the more suitable that time would be for the meeting for colleagues located in that particular time zone. The app works offline too.
Find a Common Meeting Time Across Timezones
TimeZen.com is another useful web app for finding a common meeting time across multiple timezones. While Every Time Zone provides the world time at a glance, Time Zen lets you pick cities where your colleagues are located.
To get started, add one or more cities to the list and then move the slider to see the time across each of these cities. The green area on the slider represents the time when all the selected cities are in the time range of 8am – 10pm which is generally considered a good time for a global meeting /conference call.
Friday, June 7, 2013
POWER BANK (Portable mobile chargers for phone devices)
A powerbank is a rechargeable device that's stores power giving you the opportunity to charge your phone anywhere, anytime without electricity. It has a slim, streamline design with metallic edge, touch comfortable, smart and so portable it can fit into a pocket or a lady's handbag or make up purse. It has a high-tech EL (Electro-Luminescent) display for charging and discharging state.
SPECIFICATION:-
Capacity- 5200mah
Charging time- 0-5hours
Input- 5.0v, 1000mah
Output- 5.0v, 1000mah
*normal battery capacity is 1300mah.
ADVANTAGES-
*it can charge your phone 4-5 times from battery full.
*You don't have to buy 2 or 3 extra batteries. Save yourself the stress of changing batteries.
*you will never miss a business call again.
*Handy, pocket-able and affordable.
Going to a rural area where there's no electricity? Just have a powerbank.
PROTECTIVE FUNCTION:- The powerbank protects your devices (mobile phones) from short circuit and excessive charging. Its working temperature is 40 degrees.
SUPPORTED DEVICES:- All Blackberry phones, iPhones, iPad, Samsung, Tabs and Noted,Nokia, HTC etc.
DELIVERY OPTIONS:-
Free delivery to LAGOS, IBADAN, PORT-HARCOURT.
Call or text- 07038884513 or 08030807925
email address - moyoor4ril@gmail.com
SPECIFICATION:-
Capacity- 5200mah
Charging time- 0-5hours
Input- 5.0v, 1000mah
Output- 5.0v, 1000mah
*normal battery capacity is 1300mah.
ADVANTAGES-
*it can charge your phone 4-5 times from battery full.
*You don't have to buy 2 or 3 extra batteries. Save yourself the stress of changing batteries.
*you will never miss a business call again.
*Handy, pocket-able and affordable.
Going to a rural area where there's no electricity? Just have a powerbank.
PROTECTIVE FUNCTION:- The powerbank protects your devices (mobile phones) from short circuit and excessive charging. Its working temperature is 40 degrees.
SUPPORTED DEVICES:- All Blackberry phones, iPhones, iPad, Samsung, Tabs and Noted,Nokia, HTC etc.
DELIVERY OPTIONS:-
Free delivery to LAGOS, IBADAN, PORT-HARCOURT.
Call or text- 07038884513 or 08030807925
email address - moyoor4ril@gmail.com
Saturday, June 1, 2013
I Get An Access Denied Message When I Try to Open a File on My Computer
It happens sometimes that you simply can’t access the file on a
certain PC – when you click it, it comes up with an access denied error.
Maybe you received the file from someone else or got it transferred
from one PC to another, and then you realize that there is something
wrong with it. Naturally, this can be more than irritating; especially
if you are in a hurry to do something urgent. But don’t lose your
temper, since the issue is rather simple and often there is a workable
solution that you can implement by yourself.
This can file access problem could be caused by two things: either you don’t have enough rights for opening that file or it is encrypted. Both of the situations are not too hard to fix and the only thing you need to do is follow few simple steps in order to get it completely back under your control.

You will get the main menu which contains several different options.
You need the advanced options which contain information about encryption. After pressing the “Advanced” button you will get the screen that offers you the option of encrypting a file.
See if the “Encrypt contents to secure data” check box is selected there. If you find this option selected, you need the right certificate from the person who encrypted the file.
If you manage to receive the certificate from the person who sent you an encrypted file, save this certificate file in a particular sub-folder of your choice. Usually the certificate file has (*.cer) or (*.crt) extensions.
1. Click on your windows “Start” button, type “certmgr.msc” inside the search box and hit enter. This will launch the certificate manager as shown in image below. You must be logged in as an administrator to do this.
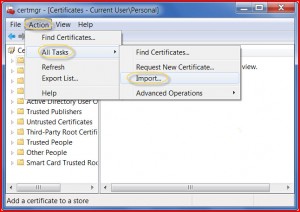
2. Click on the “Action” menu on the top menu bar, then “All Tasks” and then click “Import” as shown in figure below.

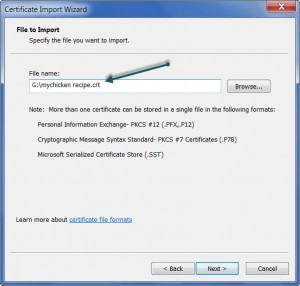
3. This will launch a new window. Click “Next” at the bottom of this window and you will reach the next window as shown in the image below. Here on this screen, just locate the certificate file (example: Mychickenrecipe.scr) from the right folder and hit “Next” again. Your computer will do the trick to decrypt the file according to this certificate and make this file readable in your PC.


When you get there, you will see a list of the users in front of you as shown in the image below.

You need to choose the “user name” you are logged in with, and to authorize it for using all of the files and performing all of the possible operations. For example, I am logged in as “User – PC” and you can see inside the permission window, I only have “read & execute” and “read” permissions. With these two permissions, I won’t be able to write or modify anything to this file.
So to empower this user account, just select all the other permissions under the “Allow” column and hit apply as shown in the image below. This will give you all the rights you need to do anything with this file.

This access control and permission screen can be used for many other important purposes including adding and removing users from various groups, and controlling various users on how they access resources on a certain PC or network. It makes sense to have a look at some of the useful things you can you do here to maximize your computing efficiency.
SiMMY_iDEAS - Where information lives, the possibilities are infinite
This can file access problem could be caused by two things: either you don’t have enough rights for opening that file or it is encrypted. Both of the situations are not too hard to fix and the only thing you need to do is follow few simple steps in order to get it completely back under your control.
#1. Encrypted File – Access Denied Message
If the file is encrypted, it is necessary to have the certificate to decrypt the file. The certificate can and has to be provided by the person who created the file. The process is very simple to see if it is an encrypted file. So let’s say you have a file named “My Chicken Recipe” that pops up with access denied when you try to open it. Just right click on it and go to properties screen as shown in image below.You will get the main menu which contains several different options.
Is Your File Encrypted
You need the advanced options which contain information about encryption. After pressing the “Advanced” button you will get the screen that offers you the option of encrypting a file.
See if the “Encrypt contents to secure data” check box is selected there. If you find this option selected, you need the right certificate from the person who encrypted the file.
If you manage to receive the certificate from the person who sent you an encrypted file, save this certificate file in a particular sub-folder of your choice. Usually the certificate file has (*.cer) or (*.crt) extensions.
Import the Encryption Certificate
Now you need to import the certificate’s information into your computer by taking the following steps:1. Click on your windows “Start” button, type “certmgr.msc” inside the search box and hit enter. This will launch the certificate manager as shown in image below. You must be logged in as an administrator to do this.
2. Click on the “Action” menu on the top menu bar, then “All Tasks” and then click “Import” as shown in figure below.

3. This will launch a new window. Click “Next” at the bottom of this window and you will reach the next window as shown in the image below. Here on this screen, just locate the certificate file (example: Mychickenrecipe.scr) from the right folder and hit “Next” again. Your computer will do the trick to decrypt the file according to this certificate and make this file readable in your PC.

#2. Access Denied Message – File Won’t Open Because You Don’t Have Permission
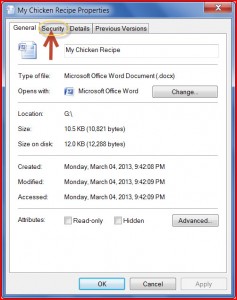
There is also a possibility that your account (which you have used to log in) simply don’t have the rights needed for the manipulation with a specific file. That can be solved pretty quickly as well if you possess the administrator rights on your PC. The process is very similar to the one we just used for encrypted file. You need to right click on the file and you will be getting the same message as in the first case. The only difference is that you need to hit the “Security” tab in this case as shown in the image below.
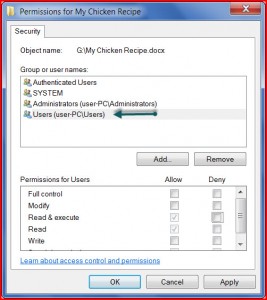
When you get there, you will see a list of the users in front of you as shown in the image below.

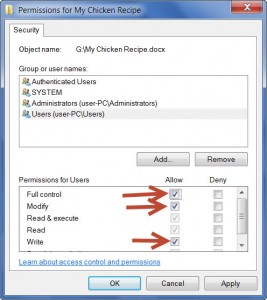
You need to choose the “user name” you are logged in with, and to authorize it for using all of the files and performing all of the possible operations. For example, I am logged in as “User – PC” and you can see inside the permission window, I only have “read & execute” and “read” permissions. With these two permissions, I won’t be able to write or modify anything to this file.
So to empower this user account, just select all the other permissions under the “Allow” column and hit apply as shown in the image below. This will give you all the rights you need to do anything with this file.

This access control and permission screen can be used for many other important purposes including adding and removing users from various groups, and controlling various users on how they access resources on a certain PC or network. It makes sense to have a look at some of the useful things you can you do here to maximize your computing efficiency.
SiMMY_iDEAS - Where information lives, the possibilities are infinite
Saturday, May 18, 2013
What is 64-bit?
What is a 64-bit?
In laymen terms, 64-bit means that a computer is equipped to process more applications at faster speeds. A 64-bit CPU processes information at faster speeds than the previous 32-bit.
Each bit can have two values so 64 bits can have 264 values and therefore makes this equivalent to over 18,000,000,000,000,000000 values, whereas 32 bits is equivalent to only over 4,000,000,000. (decimal base 10)
64-bit is a term that describes a generation of computers in which 64-bit processors are the normal standard of technology. In 2003 x86-64 and 64-bit PowerPC processor architectures were introduced into the mainstream personal computer arena but have existed in super computers since the 1970s. For more technical explanation see Wikkipedia
You can buy both hardware and software that is 64-bit. For example, you can get a 64-bit CPU, a 64-bit graphics card, a 64 bit motherboard. You can also buy a 32bit or 64 bit operating system and software to suit. You must be aware of compatibility issues when it comes to installing software on a 64-bit system. Not all 32-bit software will function on a 64 bit system with a 64-bit operating system, yet a 32-bit operating system will work on a 64-bit system.
You can easily check this by performing the following steps:
1. Go to the start menu at the bottom left corner of your screen. (Windows Vista, Seven)
2. Click on the control panel link, then choose the system and maintenance icon or just system.

3. Click Performance Information and Tools as shown above in the screenshot.
4. Click View and print details. See the screenshot below.

In laymen terms, 64-bit means that a computer is equipped to process more applications at faster speeds. A 64-bit CPU processes information at faster speeds than the previous 32-bit.
Each bit can have two values so 64 bits can have 264 values and therefore makes this equivalent to over 18,000,000,000,000,000000 values, whereas 32 bits is equivalent to only over 4,000,000,000. (decimal base 10)
64-bit is a term that describes a generation of computers in which 64-bit processors are the normal standard of technology. In 2003 x86-64 and 64-bit PowerPC processor architectures were introduced into the mainstream personal computer arena but have existed in super computers since the 1970s. For more technical explanation see Wikkipedia
You can buy both hardware and software that is 64-bit. For example, you can get a 64-bit CPU, a 64-bit graphics card, a 64 bit motherboard. You can also buy a 32bit or 64 bit operating system and software to suit. You must be aware of compatibility issues when it comes to installing software on a 64-bit system. Not all 32-bit software will function on a 64 bit system with a 64-bit operating system, yet a 32-bit operating system will work on a 64-bit system.
Is Your Computer 64-bit Compatible?
To run 64-bit applications you need to have a 64-bit capable processor. Computer users need to know how many bit their computer is so they can format the hard drive of their computer and re-install the right operating system or install the most compatible software applications.You can easily check this by performing the following steps:
1. Go to the start menu at the bottom left corner of your screen. (Windows Vista, Seven)
2. Click on the control panel link, then choose the system and maintenance icon or just system.
3. Click Performance Information and Tools as shown above in the screenshot.
4. Click View and print details. See the screenshot below.
If you have a 64-bit system and are running 64-bit Windows you will see this clearly under system type.
However if you are running 32-bit Windows you will see that is says your system is 64-bit capable.
If you have a 32-bit system you will see no reference to 64-bit.
If you cannot access Windows you can Google the model and make of your motherboard and CPU to see if they are 64-bit hardware.
Thursday, May 2, 2013
Top 5 Must Have Office Applications For Smart Phones
Everybody goes around these days with a nip-tick going over his smart
phone through his fingers.Life has become too fast-paced these days,
that Smart Phones have actually become their smart places to hang out
with and live with. From connecting to people, to connecting with the
world, going through the recent news, or just having your fun quotient
filled – all in a single place – Your Smart Phones. Not owning a one
will certainly make you a dumb in a crowd of technology-ridden people.
A Smartphone works in such a way that it does almost anything in just
one rap of a hand, but choosing which applications to suit your needs
calls for the smarter decisions. People need to study the needs of their
professional as well as personal life before choosing the apps to
download and install. Smart phones are expensive but really worth using,
if you are using them pro-efficiently. With the world getting more and
more digital day by day, and people starting to have more of their life
while on the way, it is no wonder that professionals today require great
applications to work-on over their Smart-phones which can provide them
with round-about connectivity with their business and office life. Below
listed are some of the best office apps you can use on your Smart
phones while being away from your office or work-space to keep a
regular tab on your work-life:
This application is the father of all documentation needs. It holds your
important files,documents, images, record audio and save entire web
pages to your Evernote account including the images and links, and etc.
Since its inception, it has helped people and businesses to organize
things in a much smarter way. It has been the most famous web
application for document organization while working over your PC or
Laptop. The mobile version distinctively provides you with similar
functionality.Search files in the search tab by simply typing in the
keyword.
You can store your digital version of business card in the in the app
and simply send the file to anyone’s phone through Bluetooth. To
effortlessly synchronize your business data, a desktop version of this
application is also present.
2)Sign Now:
This Smartphone app helps you in running a virtual office from anywhere.
With this application you can sign documents. It eliminates the need
for your office employee to print copies of the document and bring them
to you wherever you are to have your signatures. You can easily get the
files you’re your employees, and return them the files after signing
them, along with some other vital information that only you can provide.
3)Camscanner:
Another useful and powerful application is Camscanner. It helps to
transforms an Android or iPhone into a virtual mobile scanner. You just
simply take a picture of the document, which is needed to copy such as
receipts, contracts, notes or even whiteboard discussions. It comes with
additional features which allow you to remove unnecessary backgrounds
of the photos, and you can also crop, and improve the quality of the
picture of the copied document. If you want a PDF version of the copied,
you can simply convert that too here. It allows a simple process of
file sharing remotely with your colleagues and employees from anywhere.
Camscanner also has features to upload files to the cloud storage,
which used by the virtual office.
4)Skype:
Skype is the famous telephony internet service provider. It is so
popular that even Google regards it for its usability in the
professional field. Being so popular a medium, how can it be deviated
from the mobile World? This app provides you all the features that its
desktop version allows – Messaging services,low-cost calls, sending
files, pictures, videos and making free Skype-to-Skype video calls to
the Skype contacts- both PC and Mobile versions.
MSOffice is the most used document preparation application in the world.
And with growing shifting of the people towards the mobile variant has
led its coming for the mobile world also. Having the power of MSOffice
in your hand simply feels so great and reduces so much of headache of
arranging and compiling all your word, excel and ppt works. CloudOn also
provides you with feature for syncing documents among your Box, Google
Drive, SkyDrive and Dropbox accounts. With this application,previewing
large no. of files like PDF, PNG, JPG, GIF, etc. has become so much
simpler, anywhere.
These are the most prolific and must-have mobile applications, that all
professionals should have on their Smart-Phones to make their work life
more easier and accessible.
5 Finest And Best Online Photo Editing Tools
Use of images has grown significantly in last decade alongside the
growth of digital world. In fact,even for creating a basic or advanced
website, logo for an online or offline business, product designs,social
media profiles, marketing designs or even for individual and personal
designs, you need an image. Image editing has now become an integral
part of digital and web world. Earlier, there were just some tools for
image editing like Paints (an inbuilt Windows program) and some others.
But with advancement in technology, the evolution of these tools have
widened. There are many software and online applications available,
which you can use for your basic to expert photo editing needs. We
present you here the top and best 5 online photo editing tools which you
can use to satisfy your professional and personal needs for playing
with any image:
1. Adobe Photoshop Express:
- The most advanced, used and preferred tool for photo editing and photo creation whether online or offline, considering that Adobe are the standard makers in the photography industry.
- Along with their desktop editing tool, they also have their subsequent presence among online editors also.
- This online editor is a sharpened version of their fine desktop software.
- It is a must-have tool for basic editing for beginners.
- It has a marginally different way of exhibiting probable changes to an image. It allows the view of the original as you edit it. It lets you choose from numerous versions of the image with contradictory range of adjustments of the tool, although you can use the sliders as fine too.
- The only negativity we drive for using this online tool is that it requires sign up for an account to able to use it, along with your birthday.
- Also selection of font for text addition is also very small, but being a Adobe product you can avoid this at your own risk.
2. Picnik:
- The most basic and used of all the online photo editing tools.
- It provides a fast interface, even while you open it - It looks like you are just launching desktop software.
- It provides scales of basic changes from cropping, saturation, hue and vignetting.
- It can also sync with your Flickr account which saves much of time.
3. Pixlr:
- A flash-based, and more advanced editor.
- The USP is that you get to use best of the basic Photoshop functionality, all free, in features like layers, navigation, and history.
- You can use the layering functionality to put one image over another, and many more effects to make changes to your photo.
- The best is to use the express or advanced version which provides full-screen options.
- Work with big buttons at a single click to make any no. of changes.
- Make all the adjustments like - crop, resize, colour splash, auto fix, vibrancy, touch-up, airbrush, white teeth, and others.
- Add effects like - overlays (smoke, space, vignette and others), stickers, borders, and text (which provide just 7 font options).
- Add filters like - tilt shift, noise, sharpen, blur and others.
- A lasso tool and a wand tool are given just like you use in Photoshop, also red eye reduction and clone stamp tool, and others too.
- You can your photo saved in a wide range of formats: PNG, TIFF, JPG, BMB, and PXD.
- For Android and Apple users, you can download the Pixlr apps for free.
- Pixlr Express works best for creating collages.
- Best for Touch-up and imperfection-correction in snaps of people.
- It retains the high-res with same quality post editing
- It does not require any log-in to use
- The Pixlr Grabber add-on for Chrome and Firefox allows picking online screenshots or pictures for editing with Pixlr Editor.
- You require editing knowledge for using Pixlr Editor.
- You cannot share your edited images to social networks with Pixlr Express, only the advanced editor allows so.
4. Splashup:
- It is also an advanced Flash-based editor.
- It allows opening an image from multiple places like computer, Flickr, Twitter, Facebook, and others.
- It is similar to Photoshop in layout, with filters and layers, but lesser than Pixlr.
- The interface provided is grey, along with moveable boxes.
- You are provided with saving options in multiple formats like JPG, PNG and many more.
- You can choose from various available photo quality outputs.
- The plus point is that you can edit multiple photos at once.
- You can edit even your webcam image.
- The Navigation function is not as cool as in other tools.
5. Snipshot:
- It is one of the fastest online photo editor tools.
- It gives you editing interface right from your opened browser, without any downloads, plug-ins or Flash.
- Save image in multiple formats such as PNG, JPG, GIF, JPG, or PDF.
- One-click boost increases most images output.
- Basic image alterations like brightness, contrast, sharpness, hue and saturation.
- Non-damaging photo editing, just pure and clean.
- You can also edit higher sized and large pictures, for up to 25 megapixels or even 10 MB.
While using these tools, always remember few important points:
- Always check for image resolutions before editing. You can use some add-on tools with your
- browser for this purpose, like – Measureit!.
- Never worry about ppi or dpi for online images.
- Print pictures are ought to be of at least 200 or 300 dpi.
Top 15 Online Sites For Free Storage
Our
growing needs for Internet are not only limited to browsing purpose
only. We are hooking up on the web for almost anything, from our daily
dose of world-over news, traffic updates, entertainment quest, to
business and professional liabilities. Swift Internet connections, Cloud
computing and numerous social and business tools have paved the way to
implore more day by day.
The most preferred office tool nowadays. It allows storage of
information for different files and formats. But if you are converting
your own files with the Google Docs file format, you can save more data
here.
One of the best advantages it has presented to us is the reliability and
comfort of keeping everything digital on web 2.0 for safety and
security. Almost all e-mail services providers offer privilege to keep
our data safe online on our mail accounts, but they are limited to a
particular size-space. In the last few years many companies and sites
have come along offering the option to get much larger net space for our
use, and that too for free. Let’s take a look at certain best free
online storage sites, which provide their services to all the users:
1. Dropbox:
Free Space: 2 GB.
An impeccable storage tool for people who likes to work on various
computers. You can sync files between any no. of computers that have
Dropbox installed on them. You get a public folder that builds a link
directly to the files and folders, for sharing. Not only withing your
workstations, but you can also share folders with other friends and
colleagues who have their own Dropbox accounts.
Free Space: 25 GB.
Free storage service offered by Hotmail or Windows Live. You need to
have an account on these sites, however the upload process is a little
slow and tiring.
3. Docs.Google.com:
Free Space: 1 GB
4. Adrive.com:
Free Space: 50 GB
With option of such a large storage, it is easily the most preferred and
the most substantial of all.But here’s the catch: You cannot backup
your files automatically, yet not a problem for anyone who takes care of
their files persistently.
5.Mozy.com:
Free Space: 2 GB
Easily one of the most fooled and popular free storage tools on
Internet. You can also program the tool to automatically back up your
data from your computer every week.
6. OpenDrive.com:
Free Space: 5 GB
A great tool to use if you are always the one sharing critical information with your colleagues or working on a project online.
7. Box.net:
Free Space: 1 GB
It’s USP is its simplicity. Not only with other computers and
co-workers, it allows simple sharing of the data within family members
too.
8. FlipDrive.com:
Free Space: 1 GB
According to them, they are one of the most secured sites for online
storage. And through my personal experience , they are really a reliable
tool. It can be accessed from any web browser any time.
9. SugarSync.com:
Free Space: 5 GB
Its USP is that it offers very good compatibility with PC, Macbook, or
any Smart Phone. So, it gives an added advantage to people who likes to
do most of their online work on their Smart Phones nowadays.
10. Esnips.com:
Free Space: 5 GB
The best online storage for Images and videos, helping those who likes
to store their family photos and home-made videos in the digital format
for ever. You can turn off this option also, if you just wants to use
this simply for files and documents.
11. IDrive.com:
Free Space: 5 GB
It is a good, reliable and a very easy site to store and share your
digital information. The fact that it offers 5 GB of free space has
really taken this to a high usability level among the online consumers.
12. Storegate.com:
Free Space: 1 GB
This site offers easy and simple storage for files, particularly photos,
and sharing compatibility with friends and family. It’s USP is that it
allows sharing of large files at once, such as entire folders full of
images.
13. Megashares.com:
Free Space: 10 GB
It gives a URL to the user of the page of file storage which gives a quick access to the user for his data, whenever needed.
14. SpiderOak.com:
Free Space: 2 GB
It is an all-in-one service, which is very well-rounded, offering free
online storage, sharing,synchronization, and remote access.
15. DivShare.com:
Free Space: 5 GB
Majority of people online surfs for music. This online storage facility
is just specific for them. It allows storage of all types of files, but
is best for music and video, coz user can upload songs, which are
instantly stream-able and requires no download afterwards to listen to.
If you are still struck on the age-old mail dependency for your storage
or the clutters of your system hard-disk for backup of important files,
with non-reliability, then you should switch to one of these services
which will give you increases safety and security for your digital data
5 Useful PC Tips You Are Unaware Of
1. Reset your forgotten or lost BIOS password:
2. Remotely shutdown your system:
Here's a DOS tip for Windows OS, that will reset (delete) your
motherboard's BIOS password (your CMOS password) with no need to open up
the computer to remove the battery or disorder with jumpers.
It can come handy when ever lose and forget your BIOS password or if you
are working on used computers where the previous owner had BIOS
passwords set. It's important annotation here that the password is only
the one that stops a user from entering the BIOS setup at boot up, not
the one that stops you from going past the process of boot.
Usually, at boot up process, you press a keyboard key to access your
BIOS that allows you to view it or make changes. But there is no way to
enter setup, it has a password set. However a password can provide a
basic and very effective level of PC security, losing it can be a real
annoyance if you don't know how to answer the problem.
The MS-DOS command which will make this access possible is:
- DEBUG command (debug itself is a utility—debug.exe. It is located in your Windows Command folder).
It can cause serious exploitation with your computer if you do not know
how to use it effectively.This mess can end up not being able to even
boot the computer! Debug is used to labour with binary and executable
files and allows adjusting the contents of a file or CPU registery down
to the binary and byte level.
To begin debug mode:
Type debug at a MS-DOS prompt or you can state a file, i.e., DEBUG
FILE.EXE. There is a difference in output among the two methods. When
you type DEBUG only, debug responds with a hyphen (-) prompt waiting for
enter command. The second way, with a file stated,loads the file into
memory and when you type all the commands on the line, it use to start
debug.
All debug commands can be terminated at any time by pressing CTRL/C.
Accessing BIOS with DEBUG:
The basic methodology is to fool the BIOS into discerning there is a
checksum error, in such case it rearranges itself, including the
password. This is done by overturning the CMOS. For this to take effect
it is essential to know how to access the BIOS and where the checksum
value of the CMOS is situated to change it. Access to the BIOS portion
is through CMOS.
Here's what to do if you ever need to reset the password and have no
other technique, and you don't want to expose up your computer to remove
the battery or jumpers:
- Restart your computer in MS-DOS mode.
- In the C:\> or C:\WINDOWS> prompt, type DEBUG and press Enter.
- A hyphen (-) prompt will appear waiting enter commands.
- Enter the subsequent commands, pressing Enter after each one. Remember: the o is the
- letter o and stands for OUTPUT:
- 70 2e
- 71 ff
- q
- After the q command (which stands for QUIT), enter Exit.
2. Remotely shutdown your system:
Windows OS have a lot of fun functions. One of the most valuable ones
is to remotely reboot your PC. There are 2 methods to do this:
You need to have admin access to the PC to complete these actions. If this is OK, here’s the first way to do:
- Right click on - My computer, choose manage.
- Highlight the Computer Management, then click on - Action, choose - connect to another computer.
- In the display window, that opens, fill in the machine name of the PC you want to connect to and click - ok.
- After connection is done, right click on Computer Management (Remote machine name) and choose - properties.
- Go to the - Advanced tab, and then click the Settings button under Start up and recovery.Click on the Shutdown button.
- Under action choose what you wish to do - you can log off current user, shut down, restart,or power down, can also force all applications to close, close hung applications, or wait for all applications to close by themselves).
- %windir%\System32\shutdown.exe -r -m \\Machinename. The command prompt has more buttons and options. I highly suggest using shutdown.exe /? to see all the possibilities.
3. Increase your Dial-up Modem performance:
In a normal dial-up connection, you are connected at a speed like
48.3KBps, which stays there.Today's modems routinely fall back to lower
speeds if the line noise is too high to maintain a faster connection,
and sometimes they fall back too soon or too far.
Here's how to improve the dial-up performance:
- Click Start the button.
- Select Settings.
- Click Control Panel.
- Double-click on the Modems icon.
- Select your modem.
- Click the Properties button.
- Click the Connections tab.
- Click the Advanced button.
- In the "Extra settings" field, type S36=7
- Click OK to save your settings.
This will power your modem to always try to stay connected at high speeds.
4. Use Hotkeys to Switch between Programs:
If you regularly use a precise set of programs, you can establish
hotkeys that will power or directly switch amid them instead of steering
with Alt-Tab:
- Find the desktop or Start menu shortcut that starts a program and select Properties.
- On the Shortcut tab, click in the Shortcut key box, and press the key grouping you wish to use.
- Only choose key combinations that are not needed by any of your existing programs; for example, you can use:
- Alt-Shift-1, Alt-Shift-2 and so on..
5. Stop A recurring Restart Process:
Sometimes we see our system continually restarting time and again. It
gives a warning for restart on your windows screen. You can always stop
these warnings and unexpected shutdowns by following these simple
methods:
- Go to Start menu
- Click on RUN
- Enter the following command without hash-codes: "shutdown -a".
- It is done, and your system will never restart automatically again.
I hope if you try these simple tactics, you will get to see a big change
in your PC functionality at home or at other places. Stay connected for
more tips and tactics.
Monday, April 29, 2013
Formatting Hard Drive In Windows 7
All operating systems allow users to format the hard drive. Once
formatting is performed, all data in the hard drive will be erased
including the operating system. Technically, the data will be gone and
you will be able to use the full space of the hard drive to your
purposes. However, the formatted data can still be retrieved. Formatting
also checks the hard drives for errors. Both magnetic platter and SSD
drives can be formatted.
Once the formatting is complete, the user will have to reinstall the operating system. It may take a few hours to complete. Formatting is usually the last resort when virus infections in the computer cannot be quarantined. If the data is too corrupt, formatting will erase viruses and everything else with it. However, it is recommended to back up and store all required data before formatting the system.
Partitioning
Before you format and use a hard drive (internal and/or external) for backup, it needs to be partitioned. You can either divide your drive into sections of specific sizes or just use it with a single encompassing the full size of the drive.- Step 1: Click Start button
- Step 2: Right click on ‘Computer’ and select ‘Manage’
- Step 3: Under ‘Storage’, click Disk Management which can be found in
the left pane. Tip: If your drive has a size of more than 2 TB, select
GPT. If it doesn’t, select MBR. Drives that are not partitioned come
with black bars and the ‘Unallocated’ label. Partitioned drives come
with blue bars and drive letters.
- Step 4: Right click the black bar
- Step 5: Select New Simple Volume (where Volume means Partition)
- Step 6: Click Next in the Window that appears
- Step 7: Specify the size of your preference in MB. To use the drive as one whole section, without dividing into multiple sections, specify the same size as the maximum disk size in MB.
- Step 8: Click Next
- Step 9: Now give it a drive letter of your choice and click ‘Next’
- Step 10: Select ‘Format this volume’. If you plan to use the computer with other Windows machines, select ‘NTFS’. If you plan to use the computer with Macs, then choose exFAT. Make sure that the allocation unit size is at default.
- Step 11: Now you have to provide a name for the partition under Volume label
- Step 12: Make sure that you haven’t selected ‘Perform a quick format’ or ‘Enable file and folder compression’
- Step 13: Click ‘Next’
- Step 14: Double check and confirm the selections you have made before clicking ‘Finish’
Formatting for a Windows installation
- Step 1: Insert the Windows Installation disc or ‘Restore’ disc in the disc drive
- Step 2: Now click Start button and select ‘Restart’
- Step 3: Boot the PC from the disc that you inserted
- Step 4: Follow the prompts to start the restoration procedure
- Step 5: If you are using an installation disc, select the language
- Step 6: Accept the Windows terms and conditions for license
- Step 7: Select Custom from Advanced options, if and when prompted
- Step 8: Delete partitions that you don’t want with the Delete option in Drive options, after selecting the partition
- Step 9: Click the un-allocated space to select and then go to ‘Drive options’
- Step 10: Now select ‘New’. This is to create a new partition
- Step 11: Select ‘Format’ once you are done specifying the size of the new partition
- Step 12: Click ‘Next’ to start the Windows installation, once formatting is complete. The system is now fully formatted erasing all the data in the hard drive.
Conclusion
Once the formatting is complete and Windows has been installed, you can restore the backup that you have created and stored in an external drive. Although the format erases data in the hard drive, they can still be recovered to a certain extent by using simple recovery tools.Transferring iPhone Contacts To Android
The iPhone line of smartphones designed and distributed by Apple has
become one of the most widely purchased smartphones in the World. But
with the introduction of Google’s free mobile operating system named
‘Android’, smartphone manufacturers started coming up with Android
smartphones which adversely affected iPhone sales. The user interface
and simplicity are the specialty of iPhone. However, the android User
interface gained more prominence.
iPhone users may find it difficult to transfer the contacts in their iPhone to a Android phone. To transfer contacts, mails and messages from iPhone to Android, you need to convert these files to format which Android OS is capable of understanding. There is another alternative. This tutorial will be useful in helping you learn how to transfer iPhone contacts to Android using Google Contacts feature.
Using iTunes to sync to Google Contacts

You require an iCloud account for this. You should also have a backup in iCloud.


iPhone users may find it difficult to transfer the contacts in their iPhone to a Android phone. To transfer contacts, mails and messages from iPhone to Android, you need to convert these files to format which Android OS is capable of understanding. There is another alternative. This tutorial will be useful in helping you learn how to transfer iPhone contacts to Android using Google Contacts feature.
Syncing contacts to Google Contacts
Syncing iPhone contacts to Google Contacts can be done in two ways, either by using iTunes or via iCloud. But you require a Google account for both, which is free.Using iTunes to sync to Google Contacts
- Step 1: Manually backup your iPhone to the PC using iTunes
- Step 2: Open iTunes
- Step 3: Plug in the iPhone to the computer using a USB cable
- Step 4: Select iPhone in iTunes
- Step 5: Choose to Sync Contacts with Google Contacts under the Info tab. You can select Google Contacts from the dropdown box under Info tab. Now you will be prompted to provide your Gmail ID and password.
- Step 6: Enter Gmail ID and Password.
- Step 7: Wait for it to synchronize
- Step 8: After synchronization, go to Gmail and log in to your account.
- Step 9: Then select Contacts in Gmail. You will find the iPhone contacts here.
You require an iCloud account for this. You should also have a backup in iCloud.
- Step 1: Go to iCloud.com and log in to your iCloud account
- Step 2: Go to Contacts. You will see all your iPhone contacts here.
- Step 3: Press Ctrl + A to select all contacts
- Step 4: Click on Settings
- Step 5: Now select Export vCard
- Step 6: Go to Gmail.com and log in to your account
- Step 7: Select Import Contacts from the dropdown box beside ‘More’. An alert will appear now prompting you to choose the vCard file.
- Step 8: Choose the Exported vCard file you exported from iCloud
- Step 9: Click Import. Now all contacts will appear in Google Contacts
To get rid of duplicate Google Contacts
- Step 1: In Gmail Contacts, click on ‘More’
- Step 2: Now click ‘Find and Merge duplicates’. Go through the names in the page that pops up in the screen.
- Step 3: Select the duplicate contacts
- Step 4: Click Merge button at the bottom
Syncing Contacts to Android
- Step 1: Go to Menu and tap Settings in your Android phone
- Step 2: Now tap Accounts and Sync
- Step 3: Tap on Add Account and select Google
- Step 4: Tap Sign In
- Step 5: Login to the Gmail account you synced your iPhone contacts to. Wait for some time for the Sync options.
- Step 6: Tap Sync Contacts to check the checkbox
- Step 7: Tap on Finish. This will Sync your iPhone contacts to your Android phone. Verify this in your Contacts list in the phone.
Conclusion
If you don’t merge duplicate contacts in Google Contacts, you will find a lot of repeated entries after syncing the contacts to your Android phone. You will never lose Contacts even if you lose your android phone or format it because it will be always available in Google Contacts.Using Storage Spaces To Combine Drives In Windows 8
Windows 8 is Microsoft’s latest operating system in the Windows
series. It was designed to compete with mobile operating systems like
Android and features a better user interface than Windows 7. One new
feature of the OS is storage spaces. It allows users to setup flexible
and fast data storage.
Storage spaces is a technology which users can use to combine the data storing capacity of multiple disk drives into a pool and craft many virtual disks. Users can also mirror data across many multiple disk drives with this technology.
This tutorial includes the procedure to use this technology to mirror and combine drives.
Storage spaces is a technology which users can use to combine the data storing capacity of multiple disk drives into a pool and craft many virtual disks. Users can also mirror data across many multiple disk drives with this technology.
This tutorial includes the procedure to use this technology to mirror and combine drives.
Creating a storage space in Windows 8
- Step 1: Connect two or more additional storage drives to your computer. You may add internal or external drives of your preference
- Step 2: Log in to Windows
- Step 3: Hit the Windows key and bring up the Start menu
- Step 4: Select Control Panel
- You may also access the Storage space settings by searching ‘Storage spaces’ in the Start menu search field. Now click on the Settings category and select the ‘Storage Spaces’ shortcut from the left pane.
- If you haven’t created Storage spaces before, a link will appear in
the Storage spaces settings in Control Panel, to create a new storage
space.
- Step 5: Click on the link to create new storage space. Now a new window appears asking you to select drives to create the Storage pool.
- Step 6: Select the drives you want to use to create the Storage pool.
NOTE: Make sure you copy and backup all important files in the drives you select for the storage pool. Files already in the drives will be erased during the process. It’s recommended to format the drives before using them to create the storage space. - Step 7: After selecting the drives, click on ‘Create pool’ button. You will be able to add additional drives in a storage pool after creating it.
Configuring the storage pool
- Step 1: Give a name for the storage pool and select a drive letter. Windows will display the name and drive letter you provide, for the storage space.
- Step 2: Select a Resiliency type. The Resiliency type you specify
will be used by Windows to handle data in the pool. The resiliency types
and their descriptions are as follows:
None: Data will be stored as a single copy. If one of the drives fails, you will lose the data. However, no backup space will be used.
Two-way mirror: Requires at least two drives. Two copies of the data will be saved and won’t be lost if one of the drives fails.
Three-way mirror: If one or two of the drives fail, you will not lose data as Windows will save three copies.
Parity: Parity information is stored with the data protecting it from failure of a single drive. Efficient for storing video files, but time for accessing files will be slower. - Step 3: Specify a logical size of your preference regardless of the size of the drives
For instance, you can combine two 30 GB drives and specify logical size of 300 GB rather than 60 GB. Windows will notify you upon reaching the 60 GB limit, to add additional drives. - Step 4: Click the ‘Create Storage Space’ button
Conclusion
Your storage space will appear as an ordinary drive in Windows Explorer, with the name and drive letter you specified. You can encrypt this space and use it as any other normal drive. You can manage and configure storage spaces from the Storage spaces control panelDownload Videos In YouTube From Google Chrome
YouTube is a subsidiary of Google and a popular platform allowing
users to share videos. It has a database of millions of videos uploaded
by users. Users registered to YouTube are allowed to watch and upload
unlimited number of videos while unregistered users can only watch the
videos. Creating an account is not necessary as the Gmail account is
enough to sign in to YouTube.
Google Chrome, on the other hand, is a free web browser from Google packed with lots of features and improved security mechanisms. The browser launched its official extension gallery with over 1500 extensions on 2010. Now there are over 11000 extensions in Google Chrome, which users can download.
However, these extensions may request permissions from users to access their data. This tutorial will be helpful in downloading videos from YouTube using Google Chrome extensions, without having to rely on online YouTube video downloading websites.


Google Chrome, on the other hand, is a free web browser from Google packed with lots of features and improved security mechanisms. The browser launched its official extension gallery with over 1500 extensions on 2010. Now there are over 11000 extensions in Google Chrome, which users can download.
However, these extensions may request permissions from users to access their data. This tutorial will be helpful in downloading videos from YouTube using Google Chrome extensions, without having to rely on online YouTube video downloading websites.
Installing the extension
Install Google Chrome web browser first, if it’s not already in your PC. For this:- Step 1: Launch your web browser
- Step 2: Search Google for the Chrome web browser or go directly to this link: www.google.com/chrome/
- Step 3: Download Google Chrome browser set up file
- Step 4: After download, click on the set up file and install Google Chrome
- Step 5: After installation, launch Google Chrome web browser. Make sure you have the latest version of the browser installed.
- Step 6: Open Google by typing www.google.com
- Step 7: In the search bar, type ‘YouTube downloader chrome’ and press Enter The search results will now appear. You are looking for a Google Chrome extension.
- Step 8: Look for a link with ‘Chrome YouTube Downloader’ mentioned, preferably from www.chromeextensions.org This will take you to the Google Chrome extensions webpage with the Chrome YouTube Downloader extension displayed. You will notice the version number of the extension beside its name.
- Step 9: Click on the blue button on the right with a ‘+’ sign saying ‘Add to Chrome’
Clicking on the button will download a file of .crx format to the bottom left of the Google Chrome browser. It will be downloaded to the ‘Downloads’ folder of your documents. If you want to check whether the browser version supports this extension, and to check for latest versions of the extension, click on the Visit Website link from the extension details, before clicking ‘Add to Chrome’.
Using the extension in Google Chrome
- Step 10: Click on the wrench icon in the top right corner of the Google Chrome browser. The wrench icon indicates browser settings and options
- Step 11: From the menu which opens, select Tools
- Step 12: From the extended Tools menu, click on Extensions. Doing this will open a new tab in the browser. This is Google Chrome’s extension page, where you can enable and disable extensions.
- Step 13: Click and hold the downloaded .crx file
- Step 14: Drag the file to anywhere you like in the new extension page. The browser will now display a message ‘Drop to install’.
- Step 15: Drop the file in the page
- Step 16: Click ‘Add’ to confirm adding the extension to the browser You have now successfully installed the YouTube Downloader extension to Chrome browser Step 17: Go to www.YouTube.com
- Step 18: Select a video You will now be able to see the Download option in all videos you watch in YouTube.
Conclusion
You can use the download option provided by this extension to download videos in MP3 formats as well. Downloading some videos may be against the Copyright law in your area, and depends on the law. You may disable the extension whenever you want from the Extensions page of the browser.Configuring A Wireless Network In Windows XP
Windows XP is the predecessor of Microsoft Windows Vista, and used to
be the most widely used operating system before the arrival of Windows
7. The highlight of this version was the enhanced user experience. But
the successive versions – Windows Vista and 7 offered a whole another
level of user experience and Windows XP gradually faded away. However,
there are still many users who are still attached to Windows XP.
It’s comparatively easier to configure wireless network in Windows 7 than in Windows XP. A local wired network is easier to connect and configure in Windows XP. But once you connect and configure wireless networks in Windows XP, you will be able to easily do this anytime.
A Network name box will appear when you click the Add button.
If this fails, the system will be assigned a private IP address automatically and you will receive either a Limited connectivity or No connectivity message. Make sure that Windows Firewall isn’t blocking the network, otherwise you will be unable to access it.
It’s comparatively easier to configure wireless network in Windows 7 than in Windows XP. A local wired network is easier to connect and configure in Windows XP. But once you connect and configure wireless networks in Windows XP, you will be able to easily do this anytime.
Getting started
Wireless networks are automatically scanned and detected by Windows XP. The OS will attempt to connect to the discovered network automatically. However, if it doesn’t, you will have to configure the network yourself manually.- Step 1: Click Start button and then click Run
- Step 2: Type ‘ncpa.cpl’ without quotes in the Run dialog box’s empty field and hit Enter
This will open the Network Connections window.
- Step 3: When the window appears, make a right click on the Wireless Network Connection icon
- Step 4: Now click Properties in the context menu that appears. You will now see the Properties dialog box in the screen.
- Step 5: Click the Wireless Networks tab
Note: If there is no such tab in the Properties, then it means your network adapter doesn’t support Wireless Zero Configuration service. Make sure you have enabled this service and set it to ‘Automatic’.
- Step 6: Now click the Add button in the ‘Preferred networks’ section
Configuring the network
The Add button in the Wireless Network tab in the Properties box will let you add wireless networks to the system. Here you will have to configure the network by naming the access point and setting up wireless mode in the system.A Network name box will appear when you click the Add button.
- Step 1: In the SSID box (Network name), provide a name for the access point
- Step 2: Now select the appropriate network settings based on your network requirements. The computer will match the settings you selected with the router or access point configuration. If you don’t own a wireless router or any wireless access points, you can set the wireless mode to ‘Ad-hoc’. You may also have the same network name matching other computers.
- Step 3: Once you are finished with selecting all the settings, click the OK button
- Step 4: Now go back to the Properties dialog box and click ‘View Wireless Networks’ button which would be in the ‘Available networks’ section, just above ‘Preferred networks’. You will now see the Wireless Network Connection dialog box.
- Step 5: Choose the network of your preference by clicking on the network’s name
- Step 6: Now click the Connect button. This will establish a connection with the network that you have selected.
Conclusion
You have successfully established a wireless connection in Windows XP. Windows XP Service Pack 2 versions validate all wireless networks before establishing the connection. After authentication, Windows will then attempt to acquire the network address. An IP address will be obtained as a result.If this fails, the system will be assigned a private IP address automatically and you will receive either a Limited connectivity or No connectivity message. Make sure that Windows Firewall isn’t blocking the network, otherwise you will be unable to access it.
Recover Deleted Files In Windows With Undeletemyfiles Pro
Windows 7 is the predecessor of Microsoft’s Windows 8 operating
system. It came with a lot of upgrades when compared to Windows Vista,
and is compatible with all applications compatible to Windows Vista.
Processors with multiple cores have improved performance in Windows 7,
which also supports virtual hard disk drives. Even with all the
security, the OS is still susceptible to human errors.
Users commonly face the problem of accidental deletion of files. They might have used the permanent delete (Shift+delete) option, meaning that the files cannot be restored from the Recycle Bin. For an ordinary computer, the users can use file recovery software to recover the deleted data. UndeleteMyFiles Pro is one such software that can be downloaded for free. Using this software, users can recover deleted files from not just local disk drives but also from external USB devices.
Follow the steps in this tutorial to recover lost data using UndeleteMyFiles Pro.
Users commonly face the problem of accidental deletion of files. They might have used the permanent delete (Shift+delete) option, meaning that the files cannot be restored from the Recycle Bin. For an ordinary computer, the users can use file recovery software to recover the deleted data. UndeleteMyFiles Pro is one such software that can be downloaded for free. Using this software, users can recover deleted files from not just local disk drives but also from external USB devices.
Follow the steps in this tutorial to recover lost data using UndeleteMyFiles Pro.
Installing UndeleteMyFiles Pro
- Step 1: Launch your web browser
- Step 2: Copy and paste the following website link to the address bar of the browser www.undeletemyfiles.en.softonic.com/
- Step 3: Click Download to safely download the file to your PC
- Step 4: After the download is completed, double click on the downloaded .exe file
- Step 5: Click ‘Run’ if the Open File-Security Warning dialog box appears
- Step 6: Click ‘Yes’ if a User Account Control dialog box appears. This will begin the installation of UndeleteMyFiles Pro.
- Step 7: Follow the instructions to successfully install the software in your PC
Using UndeleteMyFiles Pro
Once the installation is completed, you will be able to use UndeleteMyFiles Pro to recover deleted data. Make sure you close all other running programs first.- Step 1: Double click on the UndeleteMyFiles Pro exe file to launch the software. The main screen will now appear.
- Step 2: Click on the icon named ‘File Rescue’ in the main screen. The File Rescue screen will now open, which will display your local drives.
- Step 3: Check the corresponding checkbox of the drive letter to select the drive where the deleted file was stored before deleting.
- Step 4: Now click ‘Scan’. Once the scan is completed,
UndeleteMyFiles Pro will display all the deleted files in the drive you
selected.
- Step 5: Go through the list of deleted files, and check the corresponding checkbox of the deleted file that you want to recover.
- Step 6: After making the selection, click the ‘Recover’ button at the top. A dialog box named ‘Browse for Folder’ will appear asking for the location to save the files after recovery.
- Step 7: Select a folder or make a new folder, and then click the OK button
Searching for deleted file
- Step 1: Click the ‘Deleted File Search’ icon in the main menu to search for a specific deleted file
- Step 2: Click ‘Search’ on the Search screen
- Step 3: Click Locations to choose search options and add locations to search
- Step 4: Click the Files tab to choose specific file types for the search
- Step 5: Click Search when you are done
- Step 6: Recover files from the search results as mentioned earlier
Conclusion
UndeleteMyFiles Pro is a very useful file recovery tool with lots of simple features allowing you to search for a deleted file of specific file types and sizes. This free software is also safe to use in the PC as the recovery will not corrupt other files and folders.Backing Up Gmail Account On Computer
There are quite a few email services in the internet, out of which
Google’s Gmail is the most popular. The service started offering free
email accounts for users since 2004. Gmail has a simple interface with
conversation views of emails and search options and provides over 10 GB
free storage space for each account. Gmail accounts come with great
security features, chat and mail options.
Gmail currently has over 425 million active account holders worldwide. Many users think about backing up all their emails so that they can view them without internet connections. It’s possible to do so and is recommended as every Gmail users know that Gmail sometimes experiences outages. Even if your Gmail account is experiencing technical issues, you can back up the emails to your computer provided you have an internet connection.
This tutorial provides the steps for easily backing up your Gmail account without having to rely on third party applications.
Gmail currently has over 425 million active account holders worldwide. Many users think about backing up all their emails so that they can view them without internet connections. It’s possible to do so and is recommended as every Gmail users know that Gmail sometimes experiences outages. Even if your Gmail account is experiencing technical issues, you can back up the emails to your computer provided you have an internet connection.
This tutorial provides the steps for easily backing up your Gmail account without having to rely on third party applications.
Getting Started
- Step 1: After logging into the OS, create a New Folder in a drive to store the backup
- Step 2: Now launch your web browser
- Step 3: In the web address bar, type http://www.gmail-backup.com/download and hit Enter. This opens the Gmail backup software webpage.
- Step 4: Scroll down the page until you see ‘Download gmail-backup-0.107.exe’ hyperlink
- Step 5: Click on the hyperlink to start downloading Gmail backup. A pop-up window will now appear.
- Step 6: Click on the Save File button in the Window to allow download
- Step 7: Click on the downloaded .exe file to start the installation of Gmail backup
- Step 8: Follow the instruction and Install Gmail backup in a directory of your preference
Tip: Click on ‘Download gmail-backup-0.107-linux.zip’ if you are a Linux user. You require the wxPython packages to be installed in your computer and also the ctypes module. You can find wxPython packages at www.wxpython.org. The ctypes module is available in the wxPython v2.5 package.
Using Google Backup
- Step 1: After the installation, open your web browser again
- Step 2: Type www.gmail.com in the web address bar
- Step 3: Provide your Gmail ID and password and click Sign In. You will be signed in to Gmail
- Step 4: Scroll to right and click on the downward facing arrow beside an icon resembling a gear.
- Step 5: Click Settings
The Gmail Settings page will now appear. - Step 7: In the multiple tabs above, click on ‘Forwarding and POP/IMAP’
- Step 8: In the IMAP Access options, click on Enable IMAP
This enables IMAP access to your Gmail mailbox. The message storage format in Gmail is ‘YYYYMMDD-hhmmss-nn.eml’. YYYY stands for the year (example: 2005) and MM stands for the month, as in 03 for March. DD stands for the number indicating the day. The hh is for hours, mm for minutes, and ss for seconds. This format indicates the exact time the mail was sent to you.
If you have more emails with the same time label, you will notice a number nn, which starts with 1 as the value. The plain text file labels.txt is where label assignments are stored. This file pairs the emails in the mailbox. - Step 9: Open Google Backup
- Step 10: Type the command that follows without quotes – ‘gmail-backup.exe backup dir user@gmail.com password’. Your full username and password should be provided in the command.
- Step 11: Now save the files in the New Folder you created earlier. You have successfully backed up your Gmail account.
Conclusion
You may also specify a time interval in the command, which backs up the emails from that time onwards. Just after providing the password in the command, leave a space and type the time in the format YYYYMMDD. You can back up the emails in your Gmail account if your internet service provider allows IMAP ports access. You don’t need to use command if you have the latest Gmail backup versionLinking Twitter And Facebook Accounts Without Any App
Twitter offers online microblogging and social networking services
allowing users to send and receive text based messages or ‘Tweets’ of up
to 140 characters. Only the followers will be able to reply to the
tweets made by a person. Interesting tweets and micro-blogs can gain you
followers in Twitter. The more followers there are, the more exposure
you will get.
Although it’s not as good as Facebook, Twitter allows following celebrities and popular personalities directly and keeps you posted on their updates. Now it’s possible to share the tweets made on Twitter to Facebook, without using any third party applications.
Note: This requires you to have a Twitter and Facebook account.
This tutorial provides steps to share tweets on Facebook from Twitter.


Although it’s not as good as Facebook, Twitter allows following celebrities and popular personalities directly and keeps you posted on their updates. Now it’s possible to share the tweets made on Twitter to Facebook, without using any third party applications.
Note: This requires you to have a Twitter and Facebook account.
This tutorial provides steps to share tweets on Facebook from Twitter.
Setting this up
- Step 1: Open the web browser in your computer
- Step 2: Go to the Twitter webpage. www.twitter.com
- Step 3: Sign in to Twitter with your Twitter ID and Password
- Step 4: Click on the drop-down box beside the silhouetted icon with a downward facing arrow at the top right corner of your page. This opens a drop-down menu with a few options and this is where you can access Twitter settings.
- Step 5: Click on the Settings option in the drop-down menu. This will open up a new page with your account information. You will notice a few tabs on the left pane of the window.
- Step 6: Click on the ‘Profile’ tab on the left pane of the window
- Step 7: Scroll down the page to the bottom. You will now see section titled Facebook. There will be a button beside the Facebook section that says ‘Post your Tweets to Facebook’.
- Step 8: Click on the ‘Post your Tweets to Facebook’ button. Doing this will replace the button with a new button and a message. The message says ‘Your account is not connected to Facebook’. The button says ‘Sign in to Facebook and connect your accounts’.
- Step 9: Click on the button that has appeared replacing the old button. You will now be taken to the Facebook login page.
- Step 10: Log in to Facebook with your Facebook ID and Password. Logging in will take you to the Twitter application on Facebook, where Twitter will ask for permission to ‘Manage your pages’ and ‘Post on your behalf’.
- Step 11: Click Allow. A message will be displayed now in the Twitter profile page saying ‘Your account is connected to Facebook’. This will automatically check the ‘my Facebook Profile’ checkbox under ‘Allow Twitter to the post to the wall of’ section.
- Step 12: Make sure that the ‘my Facebook Profile’ checkbox on the Twitter profile page is checked
- Step 13: Now click on the blue ‘Save Changes’ button in the Twitter profile page. You have now successfully connected your Twitter and Facebook accounts. Your Twitter feed should now appear on your Facebook timeline each time you tweet on Twitter.
- Step 14: Post a tweet in Twitter
- Step 15: Go to your Facebook profile and view your Facebook timeline to see if the Tweet has appeared. The tweet will appear on Facebook with the bluebird Twitter logo right next to the post.
Conclusion
Facebook and Twitter are two of the top ranked social networking websites. With the Facebook and Twitter accounts connected, each post in Twitter will appear immediately in your Facebook timeline as a post made by you, equivalent to a Facebook status update. However, Facebook status updates will not appear as tweets in Twitter, as Twitter only supports tweets of 140 characters length. Hopefully we will soon be able to share the pics in Twitter on Facebook as well.Using Terminal To Block Websites On Mac
Mac is an acronym for Apple’s Macintosh systems and is generally used
to refer to the operating systems of Macintosh. Simple controls and
mouse gestures make the Mac OS more user friendly than other operating
systems. Mac OS X comes with a great number of features that can easily
be mastered. The Terminal is one such feature.
Terminal or the Terminal emulator is a text based program in Mac operating systems. Users can use the Terminal to manipulate the operating system using text commands. There may be many websites that you may want to block. In Windows, you can do with the Browser itself. In Mac, it can be done with the Terminal. However, it may appear to be a bit complicated.
With this tutorial, you will be able to block websites on Mac, by using text commands with the Terminal. You will get used to the technique once you do it yourself.
Terminal or the Terminal emulator is a text based program in Mac operating systems. Users can use the Terminal to manipulate the operating system using text commands. There may be many websites that you may want to block. In Windows, you can do with the Browser itself. In Mac, it can be done with the Terminal. However, it may appear to be a bit complicated.
With this tutorial, you will be able to block websites on Mac, by using text commands with the Terminal. You will get used to the technique once you do it yourself.
How to block Websites using Terminal
- Step 1: Click the Finder
- Step 2: Now from the Finder menu, select Applications
You will now be able to see a few folders. - Step 3: Find the Utilities folder and click it. You will now see the Terminal application
- Step 4: Click Terminal. The Terminal window will now open up. Before starting, you have to backup the hosts.txt file. In this tutorial, we will back up the file in the desktop.
- Step 5: In the Terminal window, type ‘cp /etc/hosts ~/Desktop/hosts.txt’, without the quotes
- Step 6: Hit Enter. This will copy the hosts.txt file to your desktop as backup.
Blocking websites
- Step 1: After copying the hosts.txt file, type ‘sudo pico /etc/hosts’, without the quotes
- Step 2: Hit Enter, upon hitting Enter, the system will prompt you for the Administrator password.
- Step 3: Provide your administrator password and then hit Enter. The /etc/hosts file will now appear. Now you have to go to the bottom of the file.
- Step 4: Use the arrow keys and navigate to the bottom of the file. When you have reached the bottom, you can add the website that you want to block.
- Step 5: Enter the IP address ‘127.0.0.1’, without the quotes, first
- Step 6: Just after the IP address, type the domain name of the website you want to block
For example, typing “127.0.0.1www.yahoo.com” (without the quotes of course) will block Yahoo on your Mac.
The theory is as follows. 127.0.0.1 is your Local Macintosh IP. If you type the website domain name following this IP, it will tell the computer that this is the address for that domain. A website domain and a computer can never have the same IP as this can confuse the system. Due to this command, the browser of the system won’t be able to differentiate that domain you have given, to a webpage. So technically, the website will be blocked. - Step 7: Enter all the domains you want to block this way, with domains on separate lines
- Step 8: Once you are done entering the domains, press and hold Ctrl and then hit X.
You will now exit the terminal, and a Save prompt will appear. - Step 9: Press Y to Save
To put the changes into effect
- Step 1: For Mac OS 10.4.X, type the following and hit Enter lookupd –flushcache
- Step 2: For Mac OS 10.5.X and higher versions, type the following and press Enter
sudo dscacheutil –flushcache
- Step 3: Click the Terminal menu and then click ‘Quit Terminal’ to exit
- Step 4: Open any browser and type in all the domain names to make sure they are blocked.
Conclusion
This is how you can block websites by modifying host file. The website will be blocked to all users of the system. This also applies to all browsers in the system. However, if you want to block sites by keywords, you require professional blocking tools.
Subscribe to:
Posts (Atom)